This guide walks through configuring scan to email on a Ricoh printer or multifunction (MFP) using SMTP2GO as the relay. Most users finish the whole setup in about 10 minutes. By the end, your Ricoh device will send scanned documents straight to any email address, reliably, without leaning on a Microsoft or Google user account.
If you’ve landed here because scan to email used to work and suddenly stopped, jump to Troubleshooting. Most of those failures show up the same way regardless of model.
Quick reference: SMTP2GO settings for Ricoh
Use this table while you fill in the Web Image Monitor fields. Everything in the rest of the guide expands on these values.
| Ricoh field | Value | Notes |
|---|---|---|
| SMTP Server Name | mail.smtp2go.com | If your model only accepts an IP address, see Connecting to an IP Address. |
| SMTP Port No. | 2525 | If 2525 is blocked, try 587, 8025, 25, or 80. For SSL, use 465, 8465, or 443. |
| SMTP Authentication | On | Required. |
| SMTP Auth, User Name | Your SMTP2GO SMTP username | This is the username you created in your SMTP2GO account, not your account email. |
| SMTP Auth, Email Address | The email address that will appear as the sender | Must use a verified sender domain inside SMTP2GO. |
| SMTP Auth, Password | Your SMTP2GO SMTP user password | Created when you set up the SMTP user, not your dashboard login. |
| SMTP Auth, Encryption | Auto Select | Use Off only as a temporary test if encryption is causing issues. |
| Administrator Email Address | The same address you used above (usually) | This becomes the default From address. |
Need a primer on which port does what? See SMTP ports explained.
Before you start
A few quick checks save you from chasing the wrong problem later.
- Printer IP and admin access. You need the printer’s IP address (printable from the operation panel under Status or Settings) and admin credentials for Web Image Monitor.
- DNS configured on the device. Ricoh printers resolve
mail.smtp2go.comthrough whatever DNS server they’re pointed at. If DNS is missing or stale, the connection silently fails. Most networks handle this via DHCP, but it’s worth confirming on Network Settings before you blame the SMTP config. - Firmware reasonably current. Older firmware can mishandle modern TLS versions. If the device hasn’t been updated in a few years, check with your dealer or Ricoh’s support site.
- An active SMTP2GO account. Create one for free if you don’t have one yet.
- A verified sender domain. Inside SMTP2GO, go to Sending > Verified Senders > Sender Domains and confirm the domain you’ll send from has been added and verified. Skipping this is the most common reason scans land in spam later.
- An SMTP user. Create one under Sending > SMTP & API. Note the username and password somewhere safe; the printer will need both.
- Decide on a sender address. Pick one mailbox or alias on your verified domain that the printer will use as its default From address (often
scanner@yourdomain.comornoreply@yourdomain.com). That’s it for prerequisites. On to the device.
Step 1
Browse to the printer’s IP address from any computer on the same network and log in as an administrator. If you’re not sure how to find the IP or sign in, your Ricoh quick-start guide covers it; on most modern models, Settings > Machine Features Settings > System Settings shows the IP, and the default admin password is on the device label or in the dealer documentation.
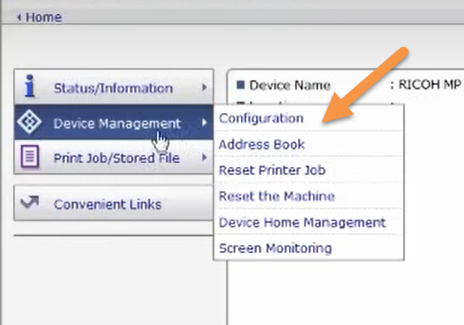
Once you’re in, go to Device Management > Configuration.
Step 2
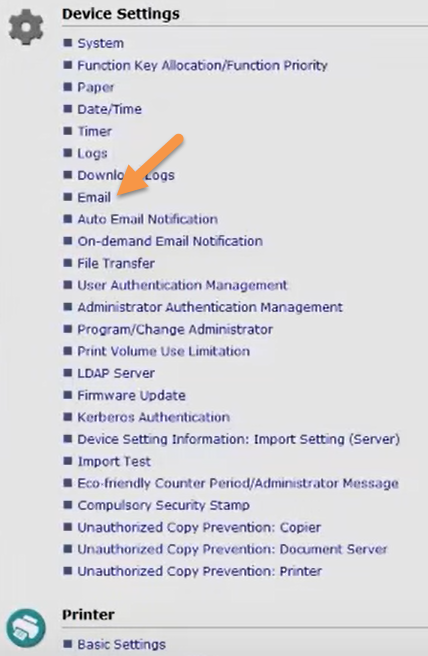
On the Configuration page, find the Device Settings group and click the Email link.
Step 3
Scroll to the SMTP section and enter the values from the quick reference table:
- SMTP Server Name:
mail.smtp2go.com - SMTP Port No.:
2525(or 25, 587, 8025 if 2525 is blocked on your network) - SMTP Authentication: select On
- SMTP Auth, Email Address: the sender address you decided on
- SMTP Auth, User Name: your SMTP2GO SMTP username
- SMTP Auth, Password: click Change and enter your SMTP2GO SMTP user password
- SMTP Auth, Encryption: leave the default Auto Select Click OK to save.

Step 4
This is the step most quick guides skip, and it’s the one that causes the most “but it sends fine from my laptop” support tickets later.
Still in Device Settings > Email, find the Administrator Email Address field. Enter the same email address you used in Step 3. This becomes the default From address on outgoing scans.
If your model has an Auto Specify Sender Name option:
- On: the printer uses the signed-in user’s email address as the sender (good for departments where multiple people scan from the same device).
- Off: the Administrator Email Address is always the sender (good for small offices and shared scanners with a single mailbox). A note on alignment: the address you put in SMTP Auth, Email Address in Step 3 should sit on a domain you’ve verified inside SMTP2GO. Sending from an unverified domain hurts deliverability and can trip Gmail and Yahoo’s 2024 inbox protection rules on the receiving end.
Save when you’re done.
Notes for specific Ricoh setups
Older models without Web Image Monitor. The same values apply, but you’ll enter them on the operation panel under Settings > System Settings > Send (Email/Folder) > Email > SMTP Server.
Devices previously configured with a Microsoft 365 or Google Workspace user account. Microsoft has retired basic authentication for SMTP AUTH and Google has tightened account-based sending. Routing scan to email through a relay like SMTP2GO is the durable fix; the credentials you set up here are independent of any individual user account, so they don’t break when Microsoft or Google changes a policy. Background: The end of Microsoft’s Basic Authentication.
Multifunction devices behind a strict firewall. If outbound port 2525 is blocked at the network edge, the cleanest fix is to ask your network admin to allow outbound traffic on mail.smtp2go.com:2525 (or :587). The IP option is a fallback, not a first choice.
FAQ
Which SMTP port should I try first? Start with 2525. It’s open on most networks, isn’t blocked by typical ISP outbound filters, and supports both unencrypted and TLS connections. If 2525 doesn’t work, try 587, then 25, then 8025.
Should I enter my email address or my SMTP2GO username in the Username field? Your SMTP2GO SMTP username, which you create under Sending > SMTP & API in your dashboard. It’s not the same as your account login email. The email address goes in the SMTP Auth, Email Address field separately.
Do I need to change MX records to use SMTP2GO for scan to email? No. MX records control inbound email for your domain. Scan to email is outbound only, so it relies on your SPF and DKIM records (and ideally DMARC) but not MX.
Why does my Ricoh ask for an IP address instead of mail.smtp2go.com? A small number of older Ricoh and OEM-licensed models won’t accept a hostname in the SMTP Server field. Use the IP address path. Functionally, you’ll get the same result.
Will this work on the SMTP2GO free plan? Yes. The free plan includes 1,000 emails per month, which is enough for most small offices doing routine scans. If you outgrow it, paid plans start small and scale.
Why does my Ricoh’s screen look different from the screenshots? Web Image Monitor changes layout slightly across firmware versions and model lines. The field names (SMTP Server Name, SMTP Port No., SMTP Authentication) are consistent across the range, even when the surrounding navigation moves around.
My printer worked yesterday and now it doesn’t. What changed? Three usual suspects: a firmware update changed TLS behavior, your network admin closed an outbound port, or your SMTP user was rotated or deleted inside SMTP2GO. Walk through Troubleshooting in order; it’s almost always one of those three.
Related guides
- Common Fixes for Scan to Email
- Having trouble with your printer or scanner?
- Connecting to an IP Address
Other printer setup guides: Kyocera multifunction printers · Lexmark printers · Sharp broadband fax · Xerox WorkCentre
Ready for reliable scan to email?
If you don’t have an account yet, start free. The free plan covers most small offices, and there’s no time limit on it.
Paid plans are available for over 1,000 emails per month.
Ready for better email delivery?
Try SMTP2GO free for as long as you like:
Try SMTP2GO Free → Paid plans available for over 1,000 emails/month.