This guide helps to setup your SMTP2GO server as the Outgoing SMTP Server in cPanel & WHM with Exim.
SMTP2GO also has a separate Beta cPanel/WHM Automation plugin that can streamline this process for web hosts and customers with large numbers of domains. Information and installation details for the plugin are on the Support Knowledgebase. Please note that the instructions below are not compatible with the installation of the plugin.
Step 1
Please change the following variables in this guide:
USERNAME: your SMTP2GO SMTP username.
PASSWORD: your SMTP2GO SMTP password.
Step 2
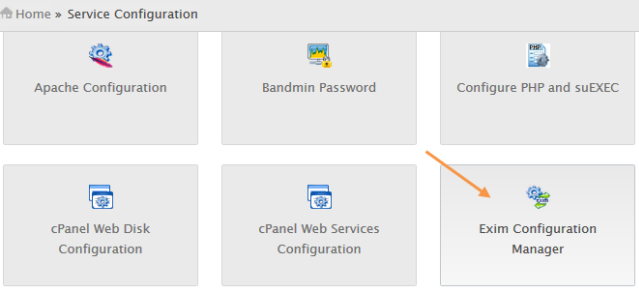
Login to your cPanel & WHM Admin Panel as Administrator. Go to Home >> Service Configuration >> Exim Configuration Manager.

Step 3
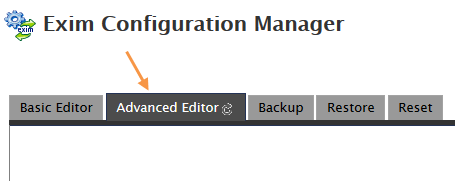
Click on Advanced Editor.

Step 4
Go to Section: AUTH and add below lines of code:
smtp2go_login:

  driver = plaintext

  public_name = LOGIN

  client_send = : USERNAME : PASSWORD
Step 5
Go to Section: ROUTERSTART and add below lines of code:
send_via_smtp2go:

  driver = manualroute

  domains = ! +local_domains

  transport = smtp2go_smtp

  route_list = * mail.smtp2go.com

  host_find_failed = defer

  no_more
Step 6
Go to Section: TRANSPORTSTART and add below lines of code:
(Port options include: 25, 465, and 80)
smtp2go_smtp:

  driver = smtp

  port = 25

  hosts = mail.smtp2go.com

  hosts_require_auth = <; $host_address

  message_linelength_limit = 99999999
Step 7
Click the Save button. This will restart Exim. If Exim does not restart, then restart it manually from server’s command line as below:
/etc/init.d/exim restartStep 8
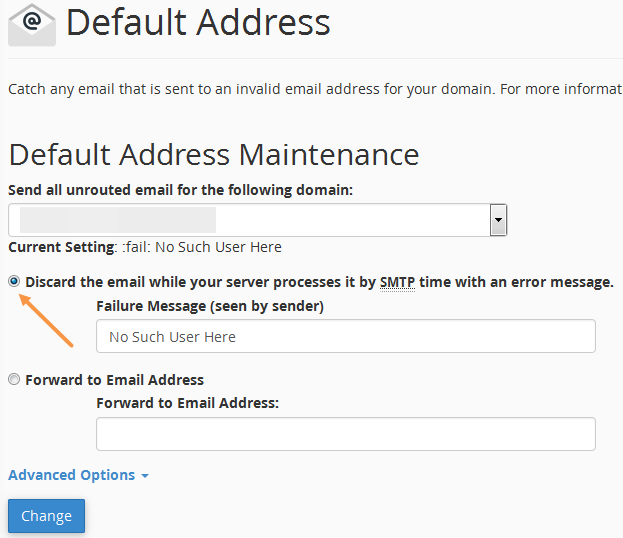
The default installation of cPanel & WHM with Exim accepts emails sent to it (even if they are sent to an email address that doesn’t exist) and then generates its own bounce notification emails. This can (and usually does) lead to problems with sending out backscatter spam. To prevent such potential backscatter spam from happening, select the option Discard the email while your server processes it by SMTP time with an error message under cPanel >> EMAIL >> Default Address. Finally click the Change button. Make sure that you have installed at least version 60 of cPanel & WHM, to ensure it works.

Step 9
Optional: If you wish to only have particular domain names send via SMTP2GO, you can use one of the options below. All other emails will be sent directly from Exim’s built in sender.
(i) Specify only certain domains (of the sender email address) to send through the smarthost
Create a text file to include the domains that should use SMTP2GO. For example, create a file /etc/exim/authorized_senders.txt. Add domain names in below format into that file:
domain1.com: mail.smtp2go.com
 domain2.com: mail.smtp2go.com
At the ROUTERSTART section, remove the route_list line, and add a route_data line as below:
route_data = ${lookup{$sender_address_domain}lsearch*{/etc/exim/authorized_senders.txt}}
Remove the no_more line.
Click the Save button. This will restart Exim.
(ii) Exclude certain domains (of the sender email address) from sending through the smarthost
Create a text file to exclude the domains from sending through the SMTP2GO. For example, create a file /etc/exim/excludesenderdomains.txt. Add domain names in below format into that file:
domain1.com:
 domain2.com:
At the ROUTERSTART section, remove the route_list line, and add a route_data line as below:
route_data = ${lookup{$sender_address_domain}lsearch*{/etc/exim/excludesenderdomains.txt}{}{mail.smtp2go.com}}
Remove the no_more line.
Click the Save button. This will restart Exim.
Ready for better email delivery?
Try SMTP2GO free for as long as you like:
Try SMTP2GO Free → Paid plans available for over 1,000 emails/month.