Step 1
Open Microsoft Dynamics CRM E-mail Router Configuration Manager.
Click the New button from the Configuration Profiles tab.
Enter a Profile Name such as SMTP2GO.
Select Outgoing from Direction list.
Select SMTP from E-mail Server Type list.
Select Clear Text from Authentication Type list.
Enter mail.smtp2go.com into E-mail Server.
Enter your SMTP2GO username into Username and your SMTP2GO password into Password. You can view and change these values by logging into your SMTP2GO control panel.
Click the Advanced tab.
Select the ‘Use SSL’ option and change your Network Port Number to 465 or 8465. For a non-secure connection, you can try using Port Number 2525, 25, 8025 or 587.
Click OK and then click Publish to save changes.

Step 2
Click the Deployments tab.
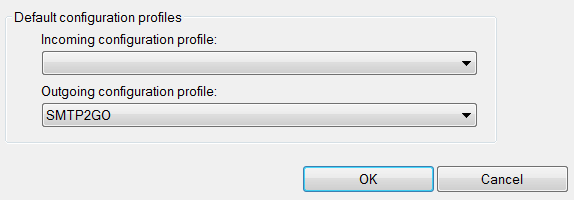
Select your Microsoft Dynamics CRM Server (If it is not created already, create a new one). Click Modify.
Select ‘SMTP2GO’ or the Profile we created in Step 1 from Outgoing configuration profile list.
Click OK and then click Publish to save changes.
Step 3
Click the Users, Queues and Forward Mailboxes tab.
Click Load Data.
You will see ONLY users and queues that have the E-mail Router option set for E-mail access type – Outgoing in your Microsoft Dynamics CRM.
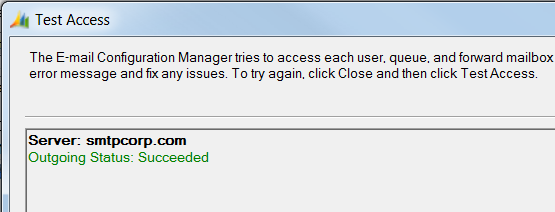
Select one of the users and click Test Access.
You will see Outgoing Status: Succeeded. This indicates the successful configuration of SMTP2GO as the outgoing SMTP server.
Click Close and then click Publish to save changes.
Ready for better email delivery?
Try SMTP2GO free for as long as you like:
Try SMTP2GO Free → Paid plans available for over 1,000 emails/month.